
Today the topic is about how we can monitor the Sangoma Vega VOIP Gateway with Nagios Core Monitoring tools. Around 6 months back I got a project to Build a Monitoring system for the entire IT infra. So I started with Nagios Core 4.3, and it was going fine. Then I stuck in with Sangoma Vega 400G VOIP Gateway. Our Telephony server is connected with this Vega device and I want to monitor the Interface status, call status and No of active calls.
I started searching the same in Google and Forums, but no Luck. Finally I got the solution and configured the same. Here I mentioned all the steps I did to configure the same. Maybe this article will help you to set up Nagios monitoring for Sangoma Vega Device.
Therefore I use the below setup for Monitor Sangoma Vega with Nagios Core
I use CentOS Linux 7.6
Nagios Configuration Directory: /usr/local/Nagios/etc/objects
First of all, you have to configure the Vega device so follow the below steps
Step-1
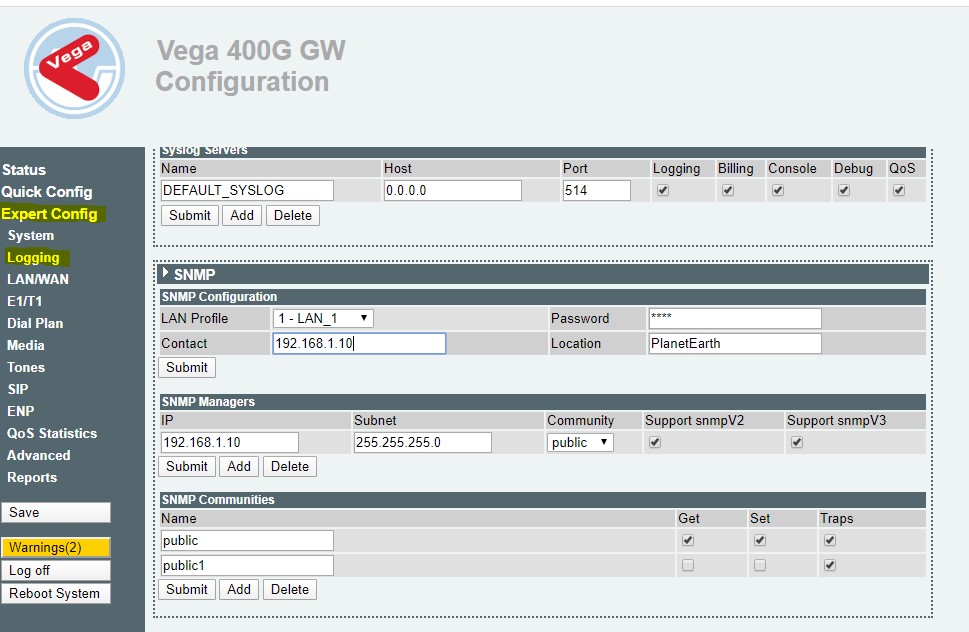
- Login to the Vega web application
- Go to Expert Config
- Under Expert Config select Logging

- Create the SNMP Communities and enable Get, Set and Traps
- Add your SNMP server IP and subnet in SNMP Manager
- Select the Community and the SNMP versions
Now we have to Add the Host in the Nagios
Now you have to add the Vega MIB file in Nagios Core.
Step-2
First of all you have to Define the Host. So I add the host details in the /usr/local/nagios/etc/objects/switch.cfg. Below is the host entry. You can also create a separate host file for that.
define host{
Use generic-switch; Inherit default values from a template
host_name vegagateway; The name we’re giving to this Gateway
alias Sangoma Vega Gateway; A longer name associated with the Gateway
address 192.168.1.1; IP address of the Gateway
hostgroups witches; Host groups this Gateway is associated with
}
After that you have to create a service Template. There for I add the below template in /usr/local/nagios/etc/objects/templates.cfg
define service{
name telephonyservice ; The ‘name’ of this service template
active_checks_enabled 1; Active service checks are enabled
passive_checks_enabled 1; Passive service checks are enabled/accepted
parallelize_check 1; Active service checks should be parallelized
obsess_over_service 1; We should obsess over this service (if necessary)
check_freshness 0; Default is to NOT check service ‘freshness’
notifications_enabled 1; Service notifications are enabled
event_handler_enabled 1; Service event handler is enabled
flap_detection_enabled 1; Flap detection is enabled
process_perf_data 1 ; Process performance data
retain_status_information 1 ; Retain status information across program restarts
retain_nonstatus_information 1 ; Retain non-status information across program restarts
is_volatile 0; The service is not volatile
check_period 24×7; The service can be checked at any time of the day
max_check_attempts 3; Re-check the service up to 3 times
check_interval 5; Check the service every 10 minutes
retry_interval 2; Re-check the service every two minutes
contact_groups admins; Notifications get sent out to everyone in the ‘admins’ group
notification_options w,u,c,r; Send notifications about warning, unknown, critical, and recovery notification_interval 10; Re-notify about service problems every hour
notification_period 24×7; Notifications can be sent out at any time
register 0; DON’T REGISTER THIS DEFINITION – IT’S NOT A REAL SERVICE
}
Step-3
After that You have to do the below services entry /usr/local/nagios/etc/objects/switch.cfg under SERVICE DEFINITIONS section
The below service monitor the ISDN port. The Sangoma Vega 400G have 2 LAN port and 4 PRI port
So the port range is ifOperStatus.1 – ifOperStatus.6 First 2 port is for LAN and 3-6 are for PRI
So in the below Service definition it will monitor the First PRI port
define service{
use telephonyservice; Inherit values from a template
host_name vegagateway; The name of the host the service
service_description ISDN-Port1; The service description
check_command check_snmp!-C public -o ifOperStatus.3 -r 1 -m RFC1213-MIB; The command used to monitor the service
check_interval 5; Check the service every 5 minutes under normal conditions
retry_interval 1; Re-check the service every minute until its final/hard state is determined
}
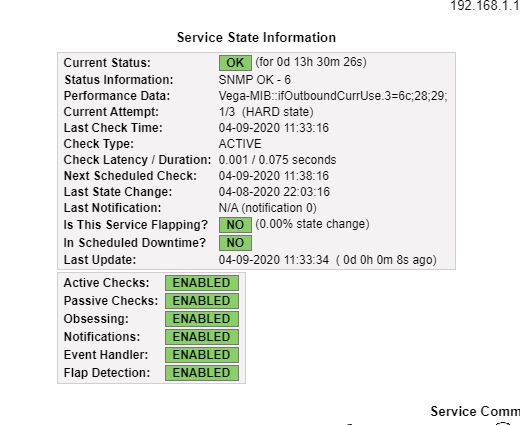
The below service monitors the concurrent calls on that particular port. Here I also use the same port similarly ifOutboundCurrUse.3 mean the first PRI port
define service{
use telephonyservice; Inherit values from a template
host_name vegagateway; The name of the host the service
service_description Calls-Port1; The service description
check_command check_snmp!-C public -o ifOutboundCurrUse.3 -r 1 -m Vega-MIB -w 28 -c 29; The command used to monitor the service
check_interval 5; Check the service every 5 minutes under normal conditions
retry_interval 1; Re-check the service every minute until its final/hard state is determined
}
Above all the few samples of monitoring. You can do even more. If you want more to monitor Sangoma Vega VOIP Gateway with Nagios Core the reply in the comment below.
// l387N9tK0P13r55P85b6
About The Author

Hello Author,
This article was really useful to me. Thanks for writing this article. Can I get in touch with you in case if I need any further help?
Thank You, We are glad that the article was helpful to you. Anytime if you need any guidance or such, then you can email us directly. Email:- [email protected]
And the concerned person will get back to you ASAP.
Hi mates, good post and fastidious arguments commented at this place, I am genuinely enjoying by these.
I have been browsing online more than 3 hours today, yet I never found any interesting article like yours. It is pretty worth enough for me. In my opinion, if all web owners and bloggers made good content as you did, the internet will be much more useful than ever before.